Build Jenkins Pipeline Triggered by Git Webhook
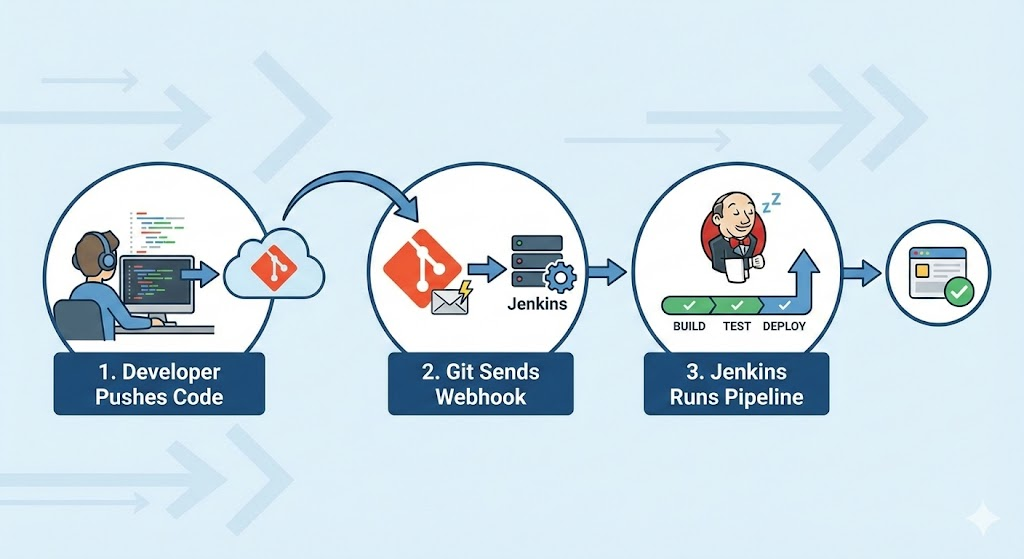
The goal: every time you push code, Jenkins builds and tests automatically—no more “Build Now” button spam. Git webhooks let your Git server (GitHub, GitLab, Bitbucket, etc.) call Jenkins via HTTP whenever there’s a new commit or pull request, and Jenkins kicks off a pipeline for you.
What is a Webhook (in Normal Human Words)?
A webhook is just an HTTP POST that your Git server sends to a URL you configure whenever a specific event happens in your repo (push, PR/MR, tag, etc.). The POST body contains a JSON payload describing what changed: repo, branch, commit SHA, author, etc.
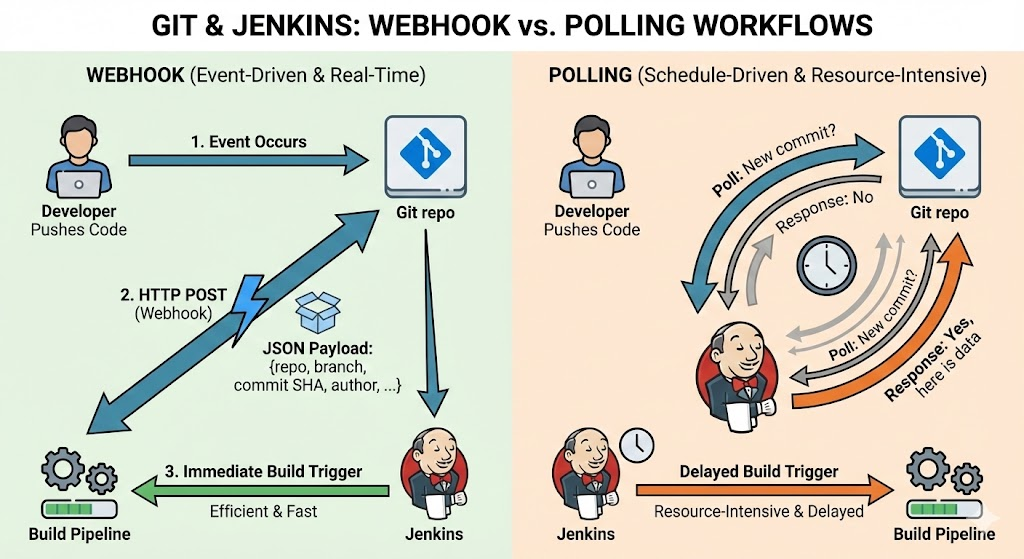
Instead of Jenkins constantly polling Git (“New commit yet? Now? How about now?”), webhooks are event-driven:
when an event occurs, Git notifies Jenkins immediately. That saves resources and makes builds almost real-time after a push.
What You Need Before Starting
You’ll need:
-
A working Jenkins instance
On a server, VM, container, or even your laptop (localhost is fine for testing). -
Plugins installed
- Git plugin
- GitHub plugin (if using GitHub)
- GitLab plugin (if using GitLab)
-
A Git repo on GitHub/GitLab/Bitbucket where you can configure webhooks.
-
A Jenkinsfile or Pipeline script defining your stages: build, test, deploy.
If Jenkins is running only on localhost, you’ll also need something like ngrok to expose Jenkins to the internet so Git can send it a webhook.
Step 1: Install Required Plugins in Jenkins
In Jenkins:
- Go to Manage Jenkins → Manage Plugins → Available.
- Install:
- Git
- GitHub (for GitHub)
- GitLab (for GitLab)
- Click Install without restart (restart if Jenkins asks nicely).
These plugins give Jenkins the ability to clone your repo and understand incoming webhook events.
Step 2: Create a Jenkins Pipeline Job
You have two main choices:
- Pipeline: for a single branch (e.g.,
main). - Multibranch Pipeline: automatically creates sub-jobs for each branch in your repo.
Let’s start with a simple Pipeline job:
- From the Jenkins dashboard, click New Item.
- Enter a name (e.g.,
github-webhook-demo). - Choose Pipeline and click OK.
- In Build Triggers, tick:
- For GitHub: GitHub hook trigger for GITScm polling
- For GitLab: Build when a change is pushed to GitLab
- In the Pipeline section:
- Choose Pipeline script from SCM.
- Set SCM to Git.
- Repository URL: your repo URL (e.g.
https://github.com/your-user/your-repo.git). - Credentials: add a personal access token or username/password if the repo is private.
- Branch Specifier:
*/mainor whichever branch you want. - Script Path:
Jenkinsfile(assuming you keep your pipeline in that file).
Click Save.
Now Jenkins is ready to be triggered by webhooks—it just doesn’t have a caller yet.
Step 3 (Optional): Expose Local Jenkins Using ngrok
If Jenkins is running on your local machine (e.g., http://localhost:8080), GitHub/GitLab cannot reach it directly. Use ngrok as a quick tunnel.
On your machine:
./ngrok http 8080
Ngrok will output something like:
Forwarding https://abc123.ngrok.io -> http://localhost:8080
Use https://abc123.ngrok.io as your public Jenkins URL in the webhook settings.
Note: free ngrok URLs change every time you restart ngrok. Great for demos, terrible for production.
Step 4: Configure Webhook in GitHub
In your GitHub repo:
- Go to Settings → Webhooks → Add webhook.
- Payload URL:
- If using ngrok:
https://abc123.ngrok.io/github-webhook/ - If using real domain:
https://jenkins.yourcompany.com/github-webhook/
- If using ngrok:
- Content type:
application/json. - Secret:
- For testing, you can leave it empty.
- For real environments, always set a secret string (Jenkins will validate it for security).
- Events:
- Select Just the push event, or add Pull requests as well if you want PR builds.
- Ensure Active is checked.
- Click Add webhook.
GitHub immediately sends a ping request. If it gets a 200 OK from Jenkins, the webhook will show a green check mark. If it’s red, click into the webhook and inspect Recent Deliveries for HTTP status and error details.
Step 5: Configure Webhook in GitLab (Alternative)
If you’re using GitLab instead:
- Open your project → Settings → Webhooks.
- URL:
- Often something like
https://jenkins.yourcompany.com/project/your-job
or the endpoint provided by the GitLab Jenkins plugin.
- Often something like
- Secret Token:
- Use the token from your Jenkins job config if the plugin generates one.
- Check the events you care about (Push events, Merge request events, Tag push, etc.).
- Optionally disable SSL verification only in dev if you’re using self-signed certificates.
- Click Add webhook.
- Click Test to send a sample event and confirm HTTP 200.
Step 6: Create a Simple Jenkinsfile
In your repo, at the root, add a file named Jenkinsfile:
pipeline {
    agent any

    stages {
        stage('Checkout') {
            steps {
                echo 'Code has been checked out by Jenkins through SCM config'
            }
        }

        stage('Build') {
            steps {
                echo 'Building the application...'
                sh 'npm install'  // or mvn clean package, docker build, etc.
            }
        }

        stage('Test') {
            steps {
                echo 'Running tests...'
                sh 'npm test'
            }
        }

        stage('Deploy') {
            when {
                branch 'main'
            }
            steps {
                echo 'Deploying to production...'
                // your deploy script here
            }
        }
    }

    post {
        success {
            echo 'Build succeeded!'
        }
        failure {
            echo 'Build failed!'
        }
    }
}
Commit and push this file to the branch Jenkins is watching (main in this example).
Step 7: Test the Whole Flow
On your local machine:
git add .
git commit -m "Test Jenkins webhook"
git push origin main
What should happen:
- GitHub/GitLab sends a webhook to the Jenkins URL.
- Jenkins receives it and notices that your repo/branch has changed.
- Jenkins automatically starts a new build of your Pipeline job.
- You see a new build number appear in Jenkins without clicking any button.
- Check Console Output to follow each stage.
If that works, congratulations: you now have a Jenkins pipeline fully driven by Git webhooks.
Common Problems and How to Fix Them
1. Webhook says “Delivered” but Jenkins doesn’t build
Typical causes:
- Build trigger checkbox is not enabled.
- Jenkins has never successfully built the job before (first run must sometimes be manual).
- Jenkins logs show no incoming event.
Fixes:
- Double‑check Build Triggers in the job:
- GitHub: GitHub hook trigger for GITScm polling.
- GitLab: Build when a change is pushed to GitLab.
- Manually run the job once from Jenkins UI so Jenkins knows the repo.
- Check
System Login Jenkins for any Git or webhook-related errors.
2. GitHub/GitLab shows 403 / 404 / timeout on the webhook
-
403 Forbidden
Jenkins endpoint is protected or CSRF is blocking the request.- Ensure you are using the correct plugin endpoint (
/github-webhook/, not something random). - Configure Jenkins security so that the webhook endpoint is allowed, or use tokens appropriately.
- Ensure you are using the correct plugin endpoint (
-
404 Not Found
The path is wrong.- Double‑check the URL: trailing slashes,
/github-webhook/vs/project/job-name, etc.
- Double‑check the URL: trailing slashes,
-
Timeout
Jenkins is unreachable (firewall, DNS issues) or too slow to respond.- Check network: can you
curlfrom outside to Jenkins URL? - Check Jenkins performance (CPU, RAM) and logs.
- Check network: can you
Securing Your Webhook
Don’t leave your Jenkins webhook endpoint wide open. At minimum:
-
Use HTTPS
Encrypts traffic between Git provider and Jenkins. -
Use a Secret/Token
- In GitHub: set the Secret field when creating the webhook.
- Jenkins (GitHub plugin) can validate the
X-Hub-Signature-256header. - In GitLab: use the Secret Token field; Jenkins plugin validates
X-Gitlab-Token.
-
Restrict source IPs
At firewall or reverse proxy level, only allow IP ranges of GitHub/GitLab to hit your webhook endpoint. -
Use authentication where supported
Some plugins support a token in the URL (?token=SECRET) that must match before a job is triggered.
These steps prevent random bots (or bored “hackers” in your office) from hammering your Jenkins with fake builds.
Bonus: Send Build Status Back to GitHub/GitLab
If you want nice green/red checks on commits and PRs:
For GitHub
- Create a GitHub Personal Access Token with
repo:statusscope. - Store it as a Secret text credential in Jenkins.
- Use
httpRequestor a dedicated plugin to POST build status to GitHub’s Statuses API inside thepostsection of your Jenkinsfile.
You’ll then see “✔ ci/jenkins — Build succeeded” right on your PR.
For GitLab
Use the GitLab plugin’s updateGitlabCommitStatus step inside your pipeline to report success/failure back to merge requests.